VoIP là một công nghệ được sử dụng để thiết lập và điều khiển các cuộc gọi điện thoại giữa nhiều điểm cuối. Nó được sử dụng trong các cổng VoIP, máy chủ hội nghị truyền hình, trung tâm cuộc gọi call center, nhà cung cấp dịch vụ và các tổ chức chính phủ trên khắp thế giới.
Nó chạy trên Linux, BSD và OS X và cho phép bạn biến hệ thống hoặc máy chủ cục bộ của mình thành một máy chủ truyền thông.
Trong bài đăng này, chúng tôi sẽ hướng dẫn cách cài đặt Asterisk trên máy chủ CentOS 8.
1. Yêu cầu hệ thống:
- Một máy chủ chạy hệ điều hành Centos 8.
- Máy chủ có thể chạy trên ảo hóa (cloud server) hoặc máy chủ vật lý.
- Cấu hình máy chủ tối thiều: 2 core, 2GB RAM, 20GB SSD, 1 IP tĩnh public.
2. Trước khi bắt đầu cài đặt:
Tắt chế độ SElinux
# vi /etc/selinux/config
Tìm tới dòng
SELINUX=disabled
Lưu lại và restart máy chủ.
3. Cài đặt công cụ cần thiết:
Asterisk yêu cầu một số gói mà bạn cần phải cài đặt trong máy chủ của mình.
Đầu tiên, cài đặt kho lưu trữ EPEL bằng lệnh sau:
# dnf install https://dl.fedoraproject.org/pub/epel/epel-release-latest-8.noarch.rpm
Bật PowerTools repo
# dnf config-manager --set-enabled PowerTools
Cài đặt cái gói cần thiết:
# dnf install wget gcc gcc-c++ svn make bzip2 patch libedit-devel uuid-devel libuuid-devel libxml2-devel sqlite sqlite-devel nano openssl openssl-devel -y
# dnf groupinstall "Development Tools"
4. Cài đặt Jansson và PJSIP:
Download kho lưu trữ git jansson về:
# git clone https://github.com/akheron/jansson.git
Tiếp theo, thay đổi thư mục thành thư mục đã tải xuống và biên dịch nó bằng lệnh sau:
# cd jansson
# autoreconf -i
# ./configure --prefix = / usr /
# make
# make install
Tiếp theo, bạn sẽ cần cài đặt PJSIP vào hệ thống của mình. Nó là một thư viện được sử dụng để triển khai giao thức SIP, SDP, RTP, STUN, TURN và ICE.
Trước tiên, hãy tải xuống bằng lệnh sau:
# cd
# git clone https://github.com/pjsip/pjproject.git
Tiếp theo, thay đổi thư mục thành thư mục đã tải xuống và biên dịch nó bằng lệnh sau:
# cd pjproject
# ./configure CFLAGS="-DNDEBUG -DPJ_HAS_IPV6=1" --prefix=/usr --libdir=/usr/lib64 --enable-shared --disable-video --disable-sound --disable-opencore-amr
# make dep
# make
# make install
# ldconfig
5. Cài đặt Asterisk:
Trước tiên, bạn tải bản asterisk về:
# cd
# wget https://downloads.asterisk.org/pub/telephony/asterisk/asterisk-18-current.tar.gz
# tar -xvzf asterisk-18-current.tar.gz
# cd asterisk-18.4.0/
# ./configure --libdir=/usr/lib64
Kết quả:
configure: Menuselect build configuration successfully completed

               .$=..
            .$7$7..          .7$7:.
          .$:.                 ,$7.7
        .$7.     7$           .$77
     ..$.       $            .$7
    ..7$   .?.   $   .?.       7$.
   $.$.   .$7. $7 .7$.      .$.
 .777.   .$77$77$7.      $,
 $~      .7$7.       .$.
.$7          .7$7:          ?$.
$          ?7$I        .$7
$       .7$      :$.
$       $7$    .$.
$        $   7$7  .$    .$.
$             $7         .$.
7$7            7$        7$
 $                        $
  $7.                       $  (TM)
   $.           .7$  $
     $7$.$
       $.

configure: Package configured for:
configure: OS type  : linux-gnu
configure: Host CPU : x86_64
configure: build-cpu:vendor:os: x86_64 : pc : linux-gnu :
configure: host-cpu:vendor:os: x86_64 : pc : linux-gnu :
Tiếp theo, Bạn cài đặt thêm các tiện ích bổ sung add-on cho tổng đài asterisk
# make menuselect
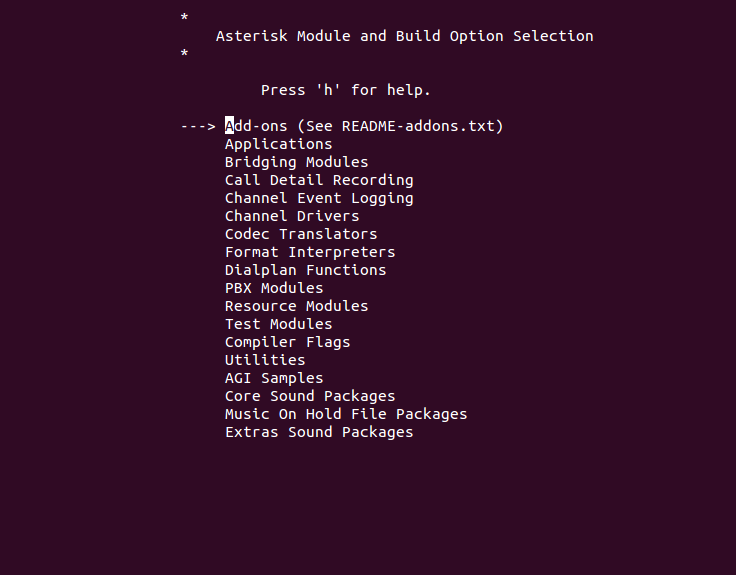
Chọn add-on phù hợp
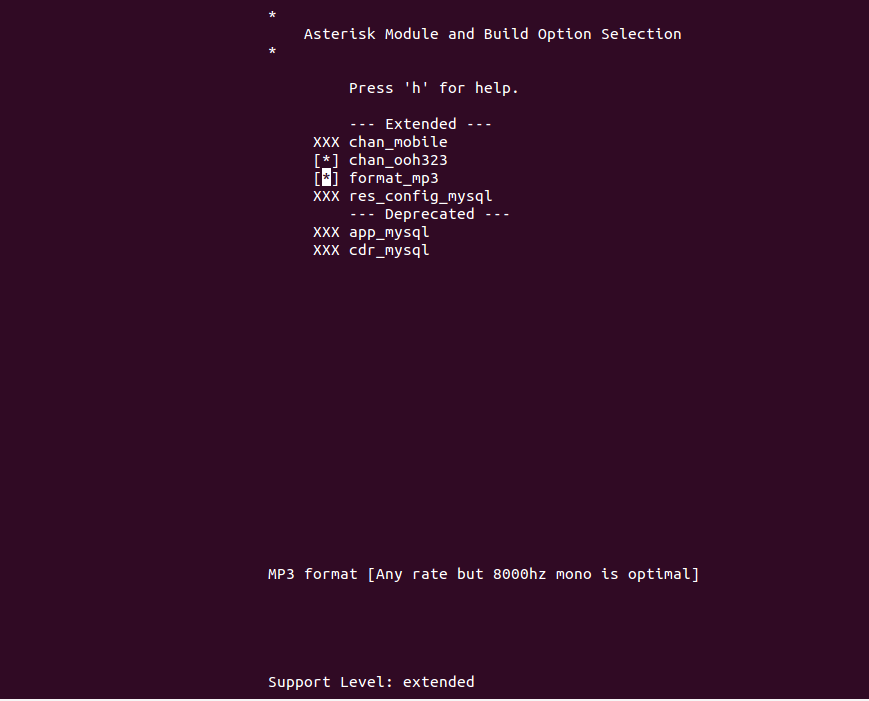
Chọn các tiện ích bổ sung cần thiết của bạn và nhấn Enter để chọn nó, sau đó nhấn ESC để quay lại menu chính:
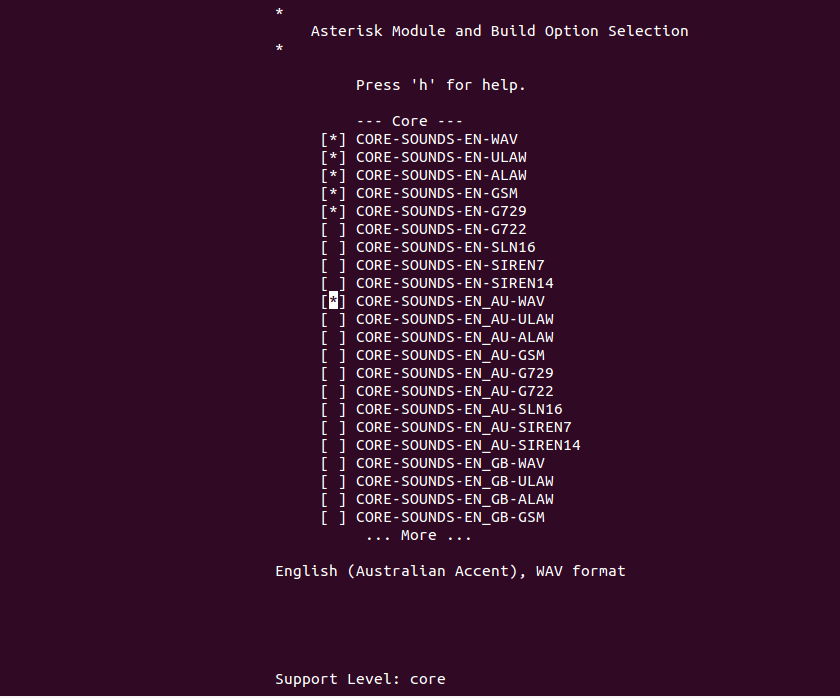
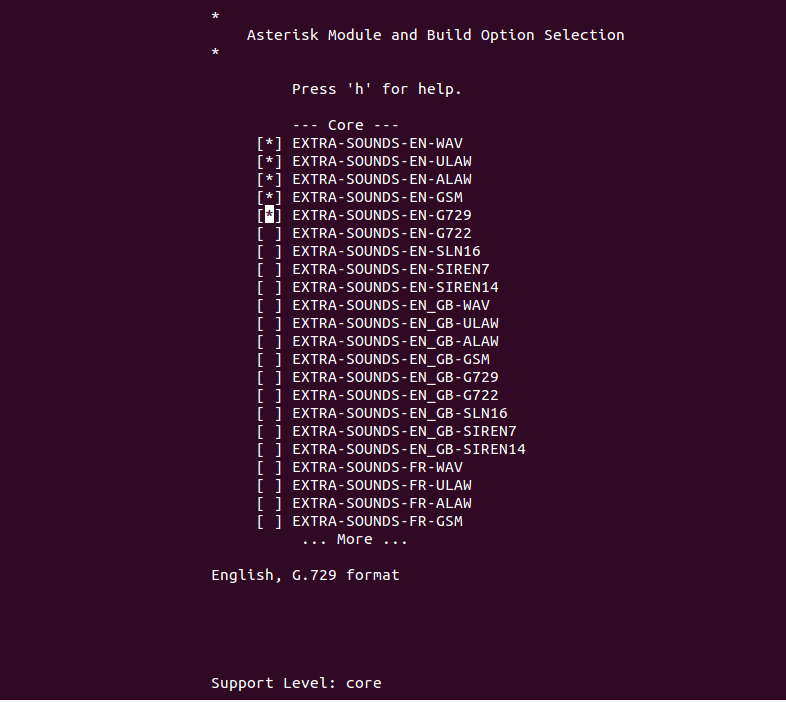
Chọn gói âm thanh Core yêu cầu của bạn và nhấn Enter để chọn gói đó. Tiếp theo, nhấn ESC để quay lại, chọn gói MOH như hình bên dưới:
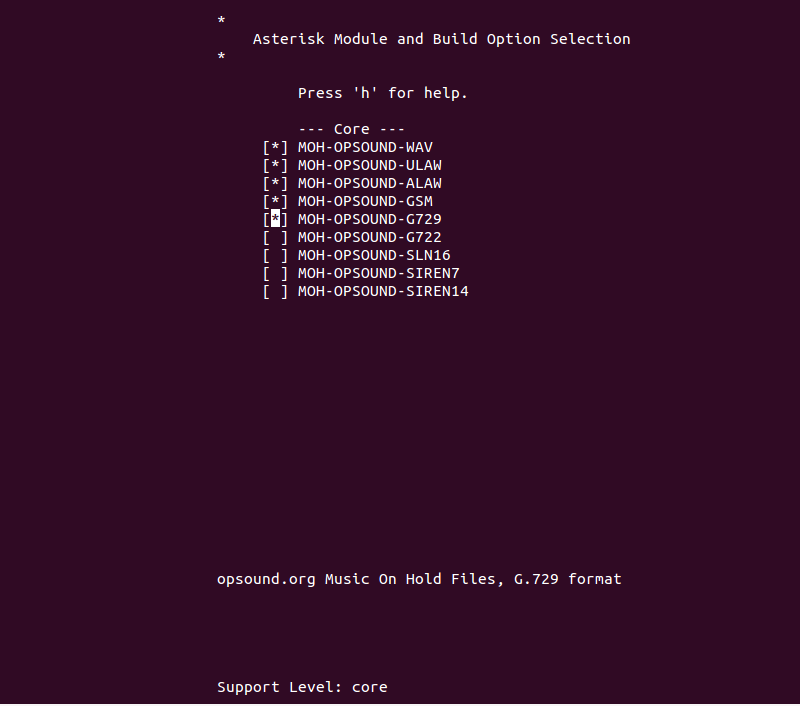
Chọn các gói yêu cầu của bạn và nhấn Enter để chọn chúng. Tiếp theo, nhấn ESC để quay lại, chọn Gói phụ như hình bên dưới:
Chọn các gói yêu cầu của bạn và nhấn Enter để chọn chúng. Sau đó, nhấn nút ESC . Bạn sẽ thấy trang sau:

Nhấn S để lưu các thay đổi và thoát.
Tiếp theo chạy các lệnh cài đặt sau:
# contrib/scripts/get_mp3_source.sh
# make
+--------- Asterisk Build Complete ---------+
 + Asterisk has successfully been built, and +
 + can be installed by running:              +
 +                                           +
 +                make install               +
 +-------------------------------------------+

make install
 +---- Asterisk Installation Complete -------+
 +                                           +
 +    YOU MUST READ THE SECURITY DOCUMENT    +
 +                                           +
 + Asterisk has successfully been installed. +
 + If you would like to install the sample   +
 + configuration files (overwriting any      +
 + existing config files), run:              +
 +                                           +
 + For generic reference documentation:      +
 +    make samples                           +
 +                                           +
 + For a sample basic PBX:                   +
 +    make basic-pbx                         +
 +                                           +
 +                                           +
 +-----------------  or ---------------------+
 +                                           +
 + You can go ahead and install the asterisk +
 + program documentation now or later run:   +
 +                                           +
 +               make progdocs               +
 +                                           +
 + **Note** This requires that you have      +
 + doxygen installed on your local system    +
 +-------------------------------------------+
# make samples
# make config
# ldconfig
6. Cấu hình Asterisk:
Tiếp theo, bạn sẽ cần tạo một user chuyên dụng để chạy Asterisk. Bạn có thể tạo user và group bằng lệnh sau:
# groupadd asterisk
# useradd -r -d /var/lib/asterisk -g asterisk asterisk
Tiếp theo, thêm user audio và quay số vào group Asterisk bằng lệnh sau:
# usermod -aG audio,dialout asterisk
# chown -R asterisk.asterisk /etc/asterisk /var/{lib,log,spool}/asterisk /usr/lib64/asterisk
Chỉnh sửa lại file asterisk
# vi /etc/sysconfig/asterisk
Bỏ các dòng sau:
AST_USER="asterisk"
AST_GROUP="asterisk"
Tiếp đến Cấu hình file asterisk.conf:
# vi /etc/asterisk/asterisk.conf
Bỏ các dòng sau:
runuser = asterisk ; The user to run as.
rungroup = asterisk ; The group to run as.
Restart và khởi động lại server:
# systemctl restart asterisk
# systemctl enable asterisk
# systemctl status asterisk
? asterisk.service - LSB: Asterisk PBX
   Loaded: loaded (/etc/rc.d/init.d/asterisk; generated)
   Active: active (running) since Sat 2021-05-22 08:19:08 EDT; 15s ago
     Docs: man:systemd-sysv-generator(8)
  Process: 70883 ExecStart=/etc/rc.d/init.d/asterisk start (code=exited, status=0/SUCCESS)
 Main PID: 70914 (asterisk)
    Tasks: 81 (limit: 25014)
   Memory: 36.8M
   CGroup: /system.slice/asterisk.service
           ??70912 /bin/sh /usr/sbin/safe_asterisk
           ??70914 /usr/sbin/asterisk -f -vvvg -c

May 22 08:19:08 centos8 systemd[1]: Starting LSB: Asterisk PBX...
May 22 08:19:08 centos8 asterisk[70883]: Starting asterisk:
7. Kiểm tra lại hệ thống Asterisk:
Hoàn thành các bước trên hệ thống Asterisk đã được cài đặt.
# asterisk -rvv
Nếu mọi cài đặt ổn định và không bị sót thì kết quả cho ra như sau:
Asterisk 18.4.0, Copyright (C) 1999 - 2021, Sangoma Technologies Corporation and others.
Created by Mark Spencer <markster@digium.com>
Asterisk comes with ABSOLUTELY NO WARRANTY; type 'core show warranty' for details.
This is free software, with components licensed under the GNU General Public
License version 2 and other licenses; you are welcome to redistribute it under
certain conditions. Type 'core show license' for details.
=========================================================================
Running as user 'asterisk'
Running under group 'asterisk'
Connected to Asterisk 18.4.0 currently running on centos8 (pid = 70914)
centos8*CLI>
Kiểm tra hệ thống core của asterisk:
# centos8*CLI> core show channels
Kết quả sẽ cho ra:
Channel              Location             State   Application(Data)
0 active channels
0 active calls
0 calls processed
Xem khả năng uptime:
centos8*CLI> core show uptime
System uptime: 1 minute, 33 seconds
Last reload: 1 minute, 33 seconds
centos8*CLI> quit
8. Cuối cùng:
Trong hướng dẫn trên, bạn đã học cách tải xuống và biên dịch Asterisk version18 trên máy chủ CentOS 8. Giờ đây, bạn có thể tích hợp Asterisk với các nền tảng khác và xây dựng ứng dụng dựa trên VoIP.
How to Install Asterisk 18 VoIP Server on CentOS 8
Asterisk is a powerful digital PBX and VoIP server released under an open-source license, so you can use it free of charge. VoIP is a technology used to establish and control telephone calls between multiple endpoints. It is used in VoIP gateways, conference servers, call centers, carriers, and government institutions around the world. It runs on Linux, BSD, and OS X and allows you to turn your local system or server into a communication server.
In this post, we will explain how to install Asterisk on CentOS 8 server.
Prerequisites
- A server running CentOS 8.
- A root password is configured on the server.
Getting Started
By default, SELinux is enabled in CentOS 8. So you will need to disable it first. To disable it, edit the SELinux configuration file:
nano /etc/selinux/config
Change the following line:
SELINUX=disabled
Save and close the file then restart your system to apply the changes.
Install Required Tools
Asterisk requires several packages that you need to install in your server. First, install the EPEL repository with the following command:
dnf install https://dl.fedoraproject.org/pub/epel/epel-release-latest-8.noarch.rpm
Next, enable the PowerTools repo with the following command:
dnf config-manager --set-enabled PowerTools
Next, install other packages and development tools with the following command:
dnf install wget gcc gcc-c++ svn make bzip2 patch libedit-devel uuid-devel libuuid-devel libxml2-devel sqlite sqlite-devel nano openssl openssl-devel -y
dnf groupinstall "Development Tools"
Once all the required packages are installed, you can proceed to the next step.
Install Jansson and PJSIP
Next, you will need to install Jansson to your system. It is used for media data encoding and decoding.
First, download it from the Git repository using the following command:
git clone https://github.com/akheron/jansson.git
Next, change the directory to the downloaded directory and compile it using the following command:
cd jansson
autoreconf -i
./configure --prefix=/usr/
make
make install
Next, you will need to install PJSIP to your system. It is a library used to implement SIP, SDP, RTP, STUN, TURN, and ICE protocol.
First, download it using the following command:
cd
git clone https://github.com/pjsip/pjproject.git
Next, change the directory to the downloaded directory and compile it using the following command:
cd pjproject
./configure CFLAGS="-DNDEBUG -DPJ_HAS_IPV6=1" --prefix=/usr --libdir=/usr/lib64 --enable-shared --disable-video --disable-sound --disable-opencore-amr
make dep
make
make install
ldconfig
Once you are finished, you can proceed to install the Asterisk.
Install Asterisk
First, navigate to your home directory and download the latest version of Asterisk with the following command:
cd
wget https://downloads.asterisk.org/pub/telephony/asterisk/asterisk-18-current.tar.gz
Once the download is completed, extract the downloaded file with the following command:
tar -xvzf asterisk-18-current.tar.gz
Next, change the directory to the extracted directory with the following command:
cd asterisk-18.4.0/
Next, configure the Asterisk with the following command:
./configure --libdir=/usr/lib64
You should see the following output:
configure: Menuselect build configuration successfully completed

               .$$=..
            .$7$7..          .7$7:.
          .$:.                 ,$7.7
        .$7.     7$           .$77
     ..$.       $            .$7
    ..7$   .?.   $   .?.       7$.
   $.$.   .$7. $7 .7$.      .$.
 .777.   .$77$77$7.      $,
 $~      .7$$7.       .$.
.$7          .7$7:          ?$.
$          ?7$$I        .$7
$       .7$$      :$.
$       $7$$    .$.
$        $   7$7  .$    .$.
$             $7         .$.
7$7            7$        7$
 $                        $
  $7.                       $  (TM)
   $.           .7$  $
     $$7$$.$
       $$.

configure: Package configured for:
configure: OS type  : linux-gnu
configure: Host CPU : x86_64
configure: build-cpu:vendor:os: x86_64 : pc : linux-gnu :
configure: host-cpu:vendor:os: x86_64 : pc : linux-gnu :
Next, run the following command to install extra add-ons that you want to install with Asterisk.
make menuselect
You should see the following page:
Select Add-ons and hit Enter. You should see the following
Select your required add-ons and hit Enter to select it then press ESC to return to the main menu:
Select your required Core sound package and hit Enter to select it. Next, press ESC to return, select MOH packages as shown below:
Select your required packages and hit Enter to select them. Next, press ESC to return, select Extra packages as shown below:
Select your required packages and hit Enter to select them. Then, press the ESC button. You should see the following page:
Press S to save the changes and exit.Advertisement
Next, run the following command to install all required dependencies:
contrib/scripts/get_mp3_source.sh
Next, build the Asterisk with the following command:
make
You should see the following output:
 +--------- Asterisk Build Complete ---------+
 + Asterisk has successfully been built, and +
 + can be installed by running:              +
 +                                           +
 +                make install               +
 +-------------------------------------------+

make install
 +---- Asterisk Installation Complete -------+
 +                                           +
 +    YOU MUST READ THE SECURITY DOCUMENT    +
 +                                           +
 + Asterisk has successfully been installed. +
 + If you would like to install the sample   +
 + configuration files (overwriting any      +
 + existing config files), run:              +
 +                                           +
 + For generic reference documentation:      +
 +    make samples                           +
 +                                           +
 + For a sample basic PBX:                   +
 +    make basic-pbx                         +
 +                                           +
 +                                           +
 +-----------------  or ---------------------+
 +                                           +
 + You can go ahead and install the asterisk +
 + program documentation now or later run:   +
 +                                           +
 +               make progdocs               +
 +                                           +
 + **Note** This requires that you have      +
 + doxygen installed on your local system    +
 +-------------------------------------------+
Next, install the Asterisk with the following command:
make samples
make config
ldconfig
Configure Asterisk
Next, you will need to create a dedicated user to run Asterisk. You can create a user and group with the following command:
groupadd asterisk
useradd -r -d /var/lib/asterisk -g asterisk asterisk
Next, add audio and dialout user to the Asterisk group with the following command:
usermod -aG audio,dialout asterisk
Next, set ownership of the Asterisk directories to asterisk user with the following command:
chown -R asterisk.asterisk /etc/asterisk /var/{lib,log,spool}/asterisk /usr/lib64/asteriskNext, edit the /etc/sysconfig/asterisk file:
nano /etc/sysconfig/asterisk
Uncomment the following lines:
AST_USER="asterisk"
AST_GROUP="asterisk"
Save and close the file then edit the /etc/asterisk/asterisk.conf file:
nano /etc/asterisk/asterisk.conf
Uncomment the following lines:
runuser = asterisk ; The user to run as.
rungroup = asterisk ; The group to run as.
Save and close the file when you are finished. Then, restart the Asterisk service to apply the changes.
systemctl restart asterisk
Next, enable the Asterisk service to start at system reboot:
systemctl enable asterisk
To check the status of the Asterisk service, run the following command:
systemctl status asterisk
You should get the following output:
? asterisk.service - LSB: Asterisk PBX
   Loaded: loaded (/etc/rc.d/init.d/asterisk; generated)
   Active: active (running) since Sat 2021-05-22 08:19:08 EDT; 15s ago
     Docs: man:systemd-sysv-generator(8)
  Process: 70883 ExecStart=/etc/rc.d/init.d/asterisk start (code=exited, status=0/SUCCESS)
 Main PID: 70914 (asterisk)
    Tasks: 81 (limit: 25014)
   Memory: 36.8M
   CGroup: /system.slice/asterisk.service
           ??70912 /bin/sh /usr/sbin/safe_asterisk
           ??70914 /usr/sbin/asterisk -f -vvvg -c

May 22 08:19:08 centos8 systemd[1]: Starting LSB: Asterisk PBX...
May 22 08:19:08 centos8 asterisk[70883]: Starting asterisk:
Verify Asterisk
At this point, Asterisk is installed and configured. You can now verify the Asterisk using the following command:
asterisk -rvv
If everything is fine, you should get the following output:
Asterisk 18.4.0, Copyright (C) 1999 - 2021, Sangoma Technologies Corporation and others.
Created by Mark Spencer <markster@digium.com>
Asterisk comes with ABSOLUTELY NO WARRANTY; type 'core show warranty' for details.
This is free software, with components licensed under the GNU General Public
License version 2 and other licenses; you are welcome to redistribute it under
certain conditions. Type 'core show license' for details.
=========================================================================
Running as user 'asterisk'
Running under group 'asterisk'
Connected to Asterisk 18.4.0 currently running on centos8 (pid = 70914)
# centos8*CLI>
Now, run the following command to display core channels:
# centos8*CLI> core show channels
You should see the following output:
Channel              Location             State   Application(Data)
0 active channels
0 active calls
0 calls processed
To display the Asterisk uptime, run the following command:
# centos8*CLI> core show uptime
You should see the following output:
System uptime: 1 minute, 33 seconds
Last reload: 1 minute, 33 seconds
To exit from the Asterisk CLI, run the following command:
# centos8*CLI> quit
Conclusion
In the above guide, you learned how to download and compile Asterisk version 18 on CentOS 8 server. You can now integrate Asterisk with other platforms and build a VoIP-based application.
Nguồn: howtoforge
